
You can check it out HERE <----go ahead and click! (but please come back here to see the details, tips, and my 2nd layout too!)
I am so exited to be able to share this Good News - and the 2 layouts that I created using the BRAND NEW ( and ADORABLE!) We R Memory Keepers COTTON TAIL Collection!
Just a little background about me for a minute if you don't mine....
As some of you may (or may not) know - I am a "late in life" scrapper - I didn't start scrapbooking until my children were @ 10 and 15 - and some of you also may know that I am NOT a fast scrapper.
As some of you may (or may not) know - I am a "late in life" scrapper - I didn't start scrapbooking until my children were @ 10 and 15 - and some of you also may know that I am NOT a fast scrapper.
I realized LONG AGO - that I will NEVER be "caught up" or even "up to date" in my scrapping - so I've let all of that "angst" go - and I now I just scrap to CREATE and work on what makes me Happy and feel GOOD at the time! Whatever moves me - or mood I am to do. To me - it is all about taking the time to honor and cherish special memories, and enjoy the creative process while doing so. ( Okay - Okay - I do secretly envy those of you that are up to date, and have all those beautiful photos of your kids scrapped since birth - but ( deep breath inserted here) I realize that will never be me - and will move on and along with my "scrap what you feel method," and enjoy every minute of it! LOL!!)
OK - if you are still here - and reading this (THANK YOU) you are probably asking yourself "Why does she think I need to know all that - and what does it have to do with Guest Designing for We R Memory Keepers??"
Well, you see, when Jenny from WRMK emailed me with the GOOD NEWS that I was selected to be a GUEST DESIGNER! on their Facebook page, and that she would be sending me some goodies from their new Cotton Tail Collection - I took a peek at the line and then said to myself -SOO CUTE - BUT - "YIKES !!- Easter Bunny Stuff !!"
You see, my "Boys" are now 23 and 17 - and I was not the most "diligent" photographer back when they were little guys and when Easter took on a bigger celebration. While I thought the Collection was beyond adorable - I wondered "What the heck am I going to do with these papers?"
Ahhh... I guess it is a good thing that I am not an up to date scrapper - RIGHT??!! LOL!
So, off I went to the dresser in the basement where I store my un-scrapped photos from years gone by ( I know, I know - not the best way/place to keep them -sorry! Hope I didn't make you cringe!) and I spent a good 1-2 hrs going through them - looking for just the right photos for these BEAUTIFUL Papers! I must say - I had the most enjoyable time doing so - and could have spent another 2 hrs down there reminiscing!
Well, I had to go "way back in time!" to 1995 and 1996. I sincerely want to THANK We R Memory Keepers for giving me the opportunity to scrap these very special and precious photos ( and save them from their banishment in the basement LOL!!)
Here is the cool Cotton Tail Scrappy Stuff that came in the box from Jenny at We R Memory Keepers:
 |
| Isn't this collection ADORABLE! |
Below is my first completed Layout that is FEATURED on their Facebook Page. I used the following papers / elements:
WRMK "Cotton Tail" ENGLISH GARDEN (diecut) on top of a page of THICKET. * I cut the center of THICKET out -and used it to STAMP the flower shapes from the acrylic stamps that were included. I cut those out and inked the edges of them. I broke out my stash of buttons and added some of those along with some felt embellishments from Close to My Heart. (yes, I sewed the buttons on to the page - I just can't do buttons without thread) I inked the edges of the papers with Ranger Distress Stain in Dusty Concord too. The yellow letters are foam and are from Thickers. ( The purple and white pearls on the trees are from my friend Marianne!)
WRMK "Cotton Tail" ENGLISH GARDEN (diecut) on top of a page of THICKET. * I cut the center of THICKET out -and used it to STAMP the flower shapes from the acrylic stamps that were included. I cut those out and inked the edges of them. I broke out my stash of buttons and added some of those along with some felt embellishments from Close to My Heart. (yes, I sewed the buttons on to the page - I just can't do buttons without thread) I inked the edges of the papers with Ranger Distress Stain in Dusty Concord too. The yellow letters are foam and are from Thickers. ( The purple and white pearls on the trees are from my friend Marianne!)
 | |||||||||||||||||||||||||||||||||||||||||||||||||||||||||||||||||||||||||||||||||||||||||||
| My oldest son Nick ( top left) was 7 at the time - snazzy tie and purple socks huh?! My youngest son Jake (top right photos) was 1 1/2 that Easter -and as you can see, he was always in perpetual motion! LOL! The bottom photo includes my Dad, and my 2 nephews too. Zachary on the far left - (the one with the big pout on his face - not sure what was the problem there!) - and the little guy is his brother Harrison. |
 | |
| Here you can see where I stamped different colors on the patterned paper - I love how these turned out - Since this is a "BOY" layout - I think cutting them in circles make them more "candy" like -and add a sweet touch to the layout. |
~*~*~*~*~*~
Besides not having many Easter photos - another "Challenge" I had with the items sent was this adorable EGG shaped Tag. I really wanted to use it - BUT - I didn't find any "EGG HUNT" photos - and I wanted to use the gorgeous STRIPE on the page of EASTER BASKET too, so I had an idea!
 |
| First - I outlined the ridge on the embossed tag, along the inner egg shape with a pencil - applying it heavy enough to transfer. |
 |
| Then, I put the tag, face down, on the BACK of the EASTER BASKET paper - on top of a foam mat, and ran my embossing stylus along that indent on the back of the tag. |
 |
| See how the pencil transferred perfectly to the paper, in the correct size / shape!! - Now I just had to erase the pencil from the tag, and cut out the new egg shape. |
 |
| I think it was the PERFECT way to add the year to the Layout - and I "filled" the hole in the top of the tag with a stamped flower and a button! I just LOVE how it came out! |
 | ||
| Here is another close up of the bottom right corner, showing the stamped flowers - you can see the Distress Stain edging, and how I used HELMAR ZAPDOTS to raise up some of the elements too. |
*~*~*~*~*~*~*
Here is the 2nd Layout that I made with some of the Cotton Tail GOODIES! These are photos of my youngest son Jake's 1st Easter. ( After looking at these photos, I want to know who the heck picked out that blue flowered furniture??? What was I thinking?? LOL!!)
 |
| I used BUNNY TAIL to make a frame, and put the lovely stripped EASTER BASKET paper behind it. The strip on the top is from EASTER TITLES, as are the 2 small strips with the eggs and chicks that I cut out - along with the word EASTER from the TITLES page. I also used my We R Memory Keepers SEW EASY Tool with the ZIG ZAG attachment on this layout - it makes sewing on your layouts really "SEW EASY!" I love the look it added to this page. |
Here is how I made the frame -
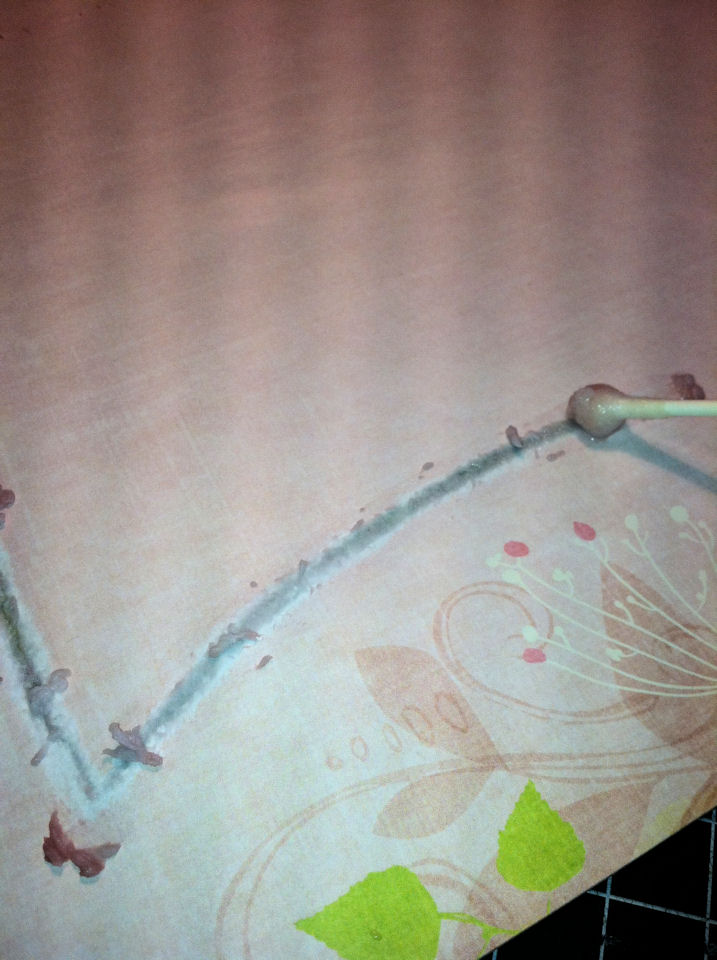 |
| I took the piece of BUNNY TAIL - and ran a Q-Tip dipped in water along the inside of the design -over and over -until the paper started to wear away and the paper was easy to tear. |
 |
| I then wet the paper again with the Q-Tip- (no rubbing this time) about1/4 - 1/2 inch in and along the edge - to make it workable and easy o fold back -pressing and creasing with my finger as I went along. I hit it with my heat gun to speed up the drying process - then inked the edges with Ranger Distress Stain in Broken China ( I just lifted the fold up a little when applying, so I didn't get any on the page itself.) |
 |
| I just love this framed look - the layers and textures make me very HAPPY! |
 |
| Here is a close up on one of the other tag that was included. It had a place for journaling - but I had this one little and ADORABLE photo of my little cutie - so I modified the tag by using an exacto knife to cute around all but the bottom of the little bunny and glazing him with Royal Coat Dimensional Magic I also added a strip of the pink eggs and chick from the EASTER TITLES along the top too! OMG - my Jake is just so cute in this pic - he was such a HAPPY Baby! |
 |
| Here is a close up of the inked edges, and you can see how I glazed these bunnies with Royal Coat Dimensional Magic too - they are just so sweet. The shiny look around the letters and highlighting the flower and the swirls was made with a SAKURA Clear Star Gelly Roll Pen -I even made some of the eggs on the little pink strips sparkly too! |
"THERE ARE NO MISTAKES IN SCRAPBOOKING -
THEY ARE ONLY OPPORTUNITIES!"
 |
| Here is a photo of the original journaling in the top left corner. Well, when I showed my finished layout to my son Jake, he said "Mom - those pictures are from 1995." UT-OH - he was right! - Jake was born in September of 1994 - so his 1st Easter would have been 1995!!! NOW WHAT?! I wrote that with a Sharpie!!! |
 |
| So - I started looking through my scraps and elements that I had left and found this cute little piece from that great TITLE page - I cut it to size - add the the CORRECT year - and VOILA! a few pop dots and problem solved! Well - if you have made it this far - and stuck with me to the end of this post - I truly THANK YOU - for your time and attention! I hope some of my techniques - even my mistakes - have inspired you! Have a wonderful weekend! I hope it is a CRAFTY one! ((HUGS)) ~ Sherri |