Pages

Showing posts with label Tattered Angles Glimmer Glaze. Show all posts

Sunday, September 9, 2012

Donna Downey's "Altered Brush Project"

Hi everyone!   I want to share my latest altered art creation with you.  I had so much fun making it - and I LOVE how it turned out! 

I altered this paint brush for Donna Downey's Altered Brush Project - you can read all about it - HERE on Donna's Blog

Did you every have a project that you pictured in your mind before you started to create it - and then it turned out even better than you had originally planned?  I am happy to say that is what happened with this paint brush!

It started out as a BLANK canvas - The brush is 4" wide and @ 8" tall.


I added some Gesso, okay - I added LOTS of Gesso on the metal section -and even added some to the top part of the bristles - Then  I heated it with my heat gun to dry - I wanted to get some color on this baby!!


Now it was time to give it a spray with one of my favorite products - Tattered Angels Glimmer Mist - this first layer was
with the Limited Edition Color "Blarney"


Time to add another layer - I spritzed it with some Tattered Angels Chalkboard Glimmer Mist - Color "Inchworm" (love that name!)  I even ran the bottom bristles through the over spray on my splat mat!


I decided to use a piece of Punchinella as a mask ( Do you know what Punchinella is?  It is the "waste" from when sequins are made!  Cool huh?!)  I had fun using the BEAUTIFUL NEW Dylusions Spray - in Vibrant Turquoise - LOVE IT!!


BUT - I really wasn't happy with the spots / mask effect -so....

I gave it another spritz with the Dylusions, and moved it around with a paint brush -and I was satisfied! I love how it filled in all the "low spots." I then ran the bristles through the over spray on the splat mat too. I added a little "Waterfall" Glimmer Glaze to the bottom of the bristles too.


Now it was time to decorate!  ( THE 2nd funnest part!)  I knew I wanted to use the peacock feathers I had in my stash -I draw lots of inspiration from them - as you can see in this project, and on many others I've made. These came from a giant fan of peacock feathers that my boss brought back for me from a trip to India -- I have used so many of them on my projects, and have used them for classes that I have taught - I will be sad when there are none left.  

I also knew I wanted to add different elements and a little BLING to the brush -so I went into my old jewelry stash, and pulled out the beautiful butterfly pin, and that round bead/sequin dark blue earring. ( These were gifts to me from my good friend, and scrapping buddy, Pattie.  They were some of the costume jewelry pieces that belonged to her mother, and she passed them along to me, as she know how much I like to add jewelry/mixed media "stuff" to my projects.  It is a pleasure to be able to add these special elements, and know that they will continue to be viewed by others, both online - and in person in Donna's studio!)

I needed some orange to pick up the details from in the butterfly, and another good friend ( my sista-from-another-mother) Stephanie ( who happens to own the cutest little scrapbook and on-line store Scrap-a-Doodle Doo!) came to the rescue with the beautiful orange spray of crystals, and the orange bling gems.  The other flowers were from my stash!
(P.S. Donna Downey is going to be teaching at THE DOO, December 14,15&16 -click on the link above for class info!)

Here are a few close ups:


I knew I wanted to use the words "DREAM BIG" and I thought the Tim Holtz Alpha Parts/Random black letters would be perfect!   I love this phrase, and draw from its strength when I am faced with disappointment, or doubt, or feel sad.  The inspiration comes from the song - "Dream Big" by Ryan Shupe and the RubberBand which is one of my favorites.  I use to have it playing on my blog -but that service no longer works ( if anyone knows how to get music on their blog -please clue me in!)  You can click on the name of the song to hear it - but be forewarned - the only video I could find has an add that you have to sit through in the beginning.

Here is the finished piece:


I will be sending it off to Donna tomorrow.  Keep watching her Blog to see all of the beautiful brushes that others have sent in - and if you are on Pintrest - you can follow along there too! I can't wait to see my brush on there soon! 

I'd love to hear from you - feel free to leave a comment!

Thanks for stopping by!
((HUGS)) ~ Sherri


Tuesday, November 29, 2011

Nov Kit of the Month Release at Scrap-a-Doodle Doo!

WOO HOO!! Tomorrow is the day my latest project releases and I just LOVE IT!!


Hi everyone!  I am SOOO VERY EXCITED to share this little SNEAK PEEK of the Mini Chipboard and Acrylic Album that I designed for my favorite Local and ON LINE Scrapbook Store ~ Scrap-a-Doodle Doo, in Ramsey, NJ.

Live far away - well then you are in luck - you can shop 24/7 on their website - just click on the name and you are there!!
** Please note - this is a LIMITED RELEASE - so when the last kit is gone - it is gone and will no longer be available - so don't hesitate if you really want one!!

I am on their Design Team, and one of the store's educators there - so if you are in the area - watch for info on my upcoming classes ( Our next class is this Saturday - JINGLE JAM is a MEGA 2 Project Class with my friend and Co DT Member, Anna  - and that class is SOLD OUT!

So - after you take a peek - Please head on over to Scrap-a-Doodle Doo's NEW Facebook Page - and "LIKE" them so you can keep informed of all upcoming SPECIALS, CLASSES and EVENTS.  Please leave a comment and tell them SHERRI sent you  ;o)

ALSO - Please "LIKE" my NEW Facebook Page For The Love of Paper  so you can keep up to date with my future classes, as well as other FUN Scrappy info and contests too!

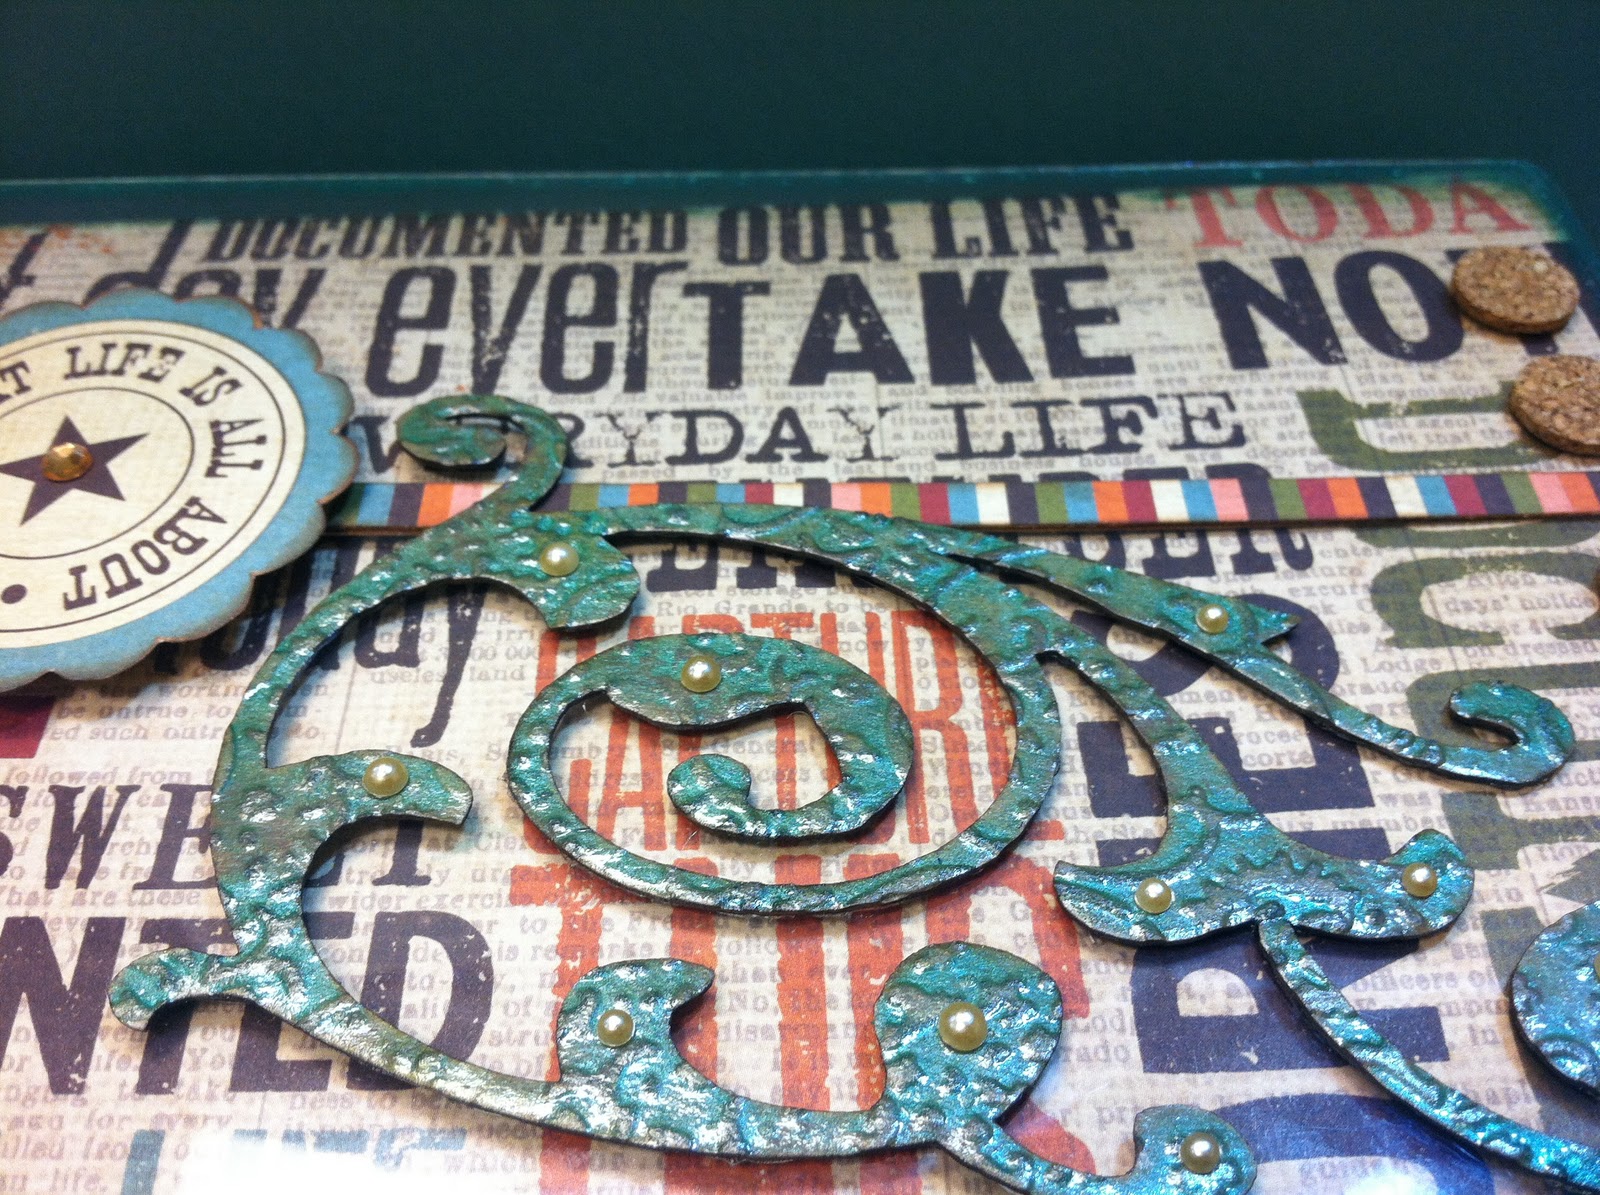
So - here is the Peek -- Don't 'cha just LUV the swirl on the cover!!!  It is a Scrap-a-Doodle Doo EXCLUSIVE -called a "DOO DAD!!"  I ran it through the CuttleBug then painted it with Tattered Angel's Aloha Green Glimmer Glaze - which is INCLUDED in your kit!!  HOT HUH?!!


Thanks for peeking!! I hope you liked, and that you LIKED  our Facebook pages too!

AND don't forget - the kits are LIMITED in QTY - so get yours before they are all gone!

'Night!
Sherri

Thursday, November 17, 2011

Beautiful La Jolla


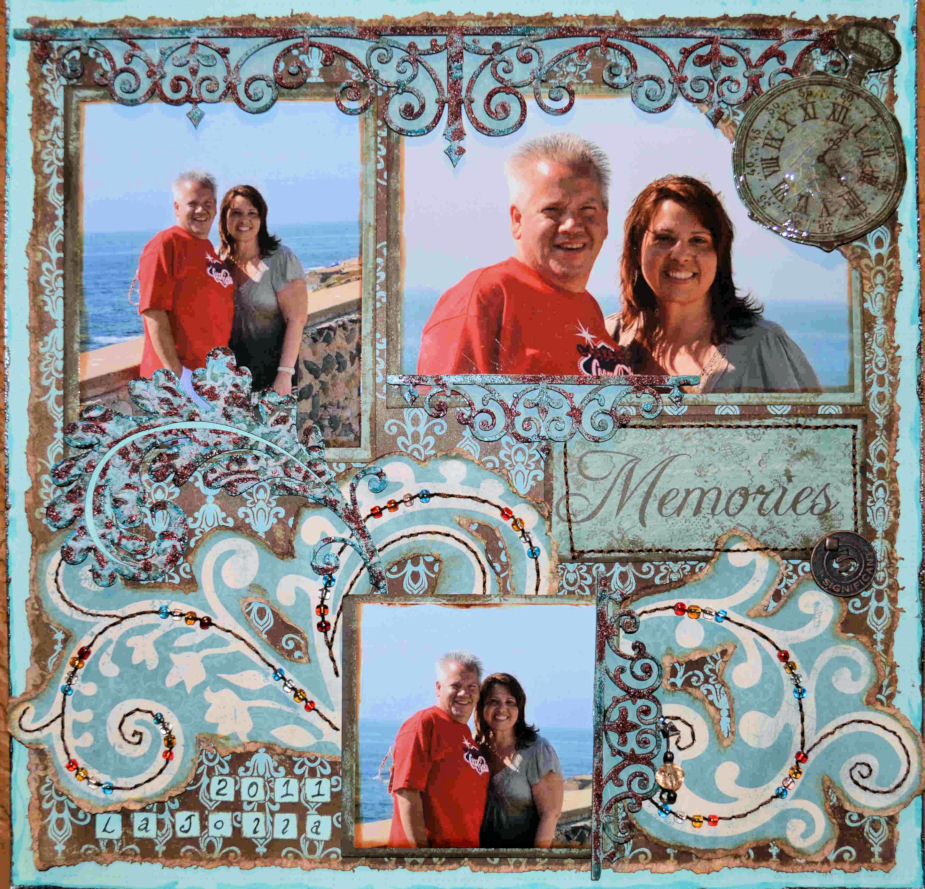
Hi Everyone - just wanted to share this layout with you.  It is my first real attempt at stitching - and it was so much FUN - I hope it inspires you to try it.  I didn't use a template or pattern - I just pre-poked holes along the swirls as evenly spaced as possible and stitched away!  Of course I couldn't "just stitch" so I added a few beads to the stitching to tie in the red of my hubby's shirt.

I am sorry, but I do not remember the name of the paper line that I used. I selected it from my "stash" as I thought the blues and browns really picked up on the beautiful colors of the rock wall and the Pacific Ocean.  This picture is from our summer vacation, when we were in beautiful La Jolla California for the day. 

I actually only used 3 pcs of paper. The swirls were cut out of the center of the blue paper you see as the beginning base.  The brown and blue pattern is paper # 2, and the word "Memories" the watch and the paper behind the chippes was from piece #3.

I used a water tearing/distressing technique to "cut out" the paper swirl designs from one piece of paper, and along the edges of the brown and blue pattern sheet too.  Those edges were further distressed with Vintage Photo Ranger Distress Stain ( one of my new favorite products!) 

I also wanted to show you how much fun and how versitale Dusty Attic Chippies can be -(this big one is called Foliage DA0506) -  I ran it through my CuttleBug first to give it texture. I gave it a light/thin coat of gesso then sprayed it with Patina Glimmer Mist, and added some Mermaid Glimmer Glam, along with some Waterfall Glimmer Glaze -"here and there."  To tone it all down and make it a little more rustic, I used Ranger Distress Embossing powder in Fired Brick to add some more RED to the layout.


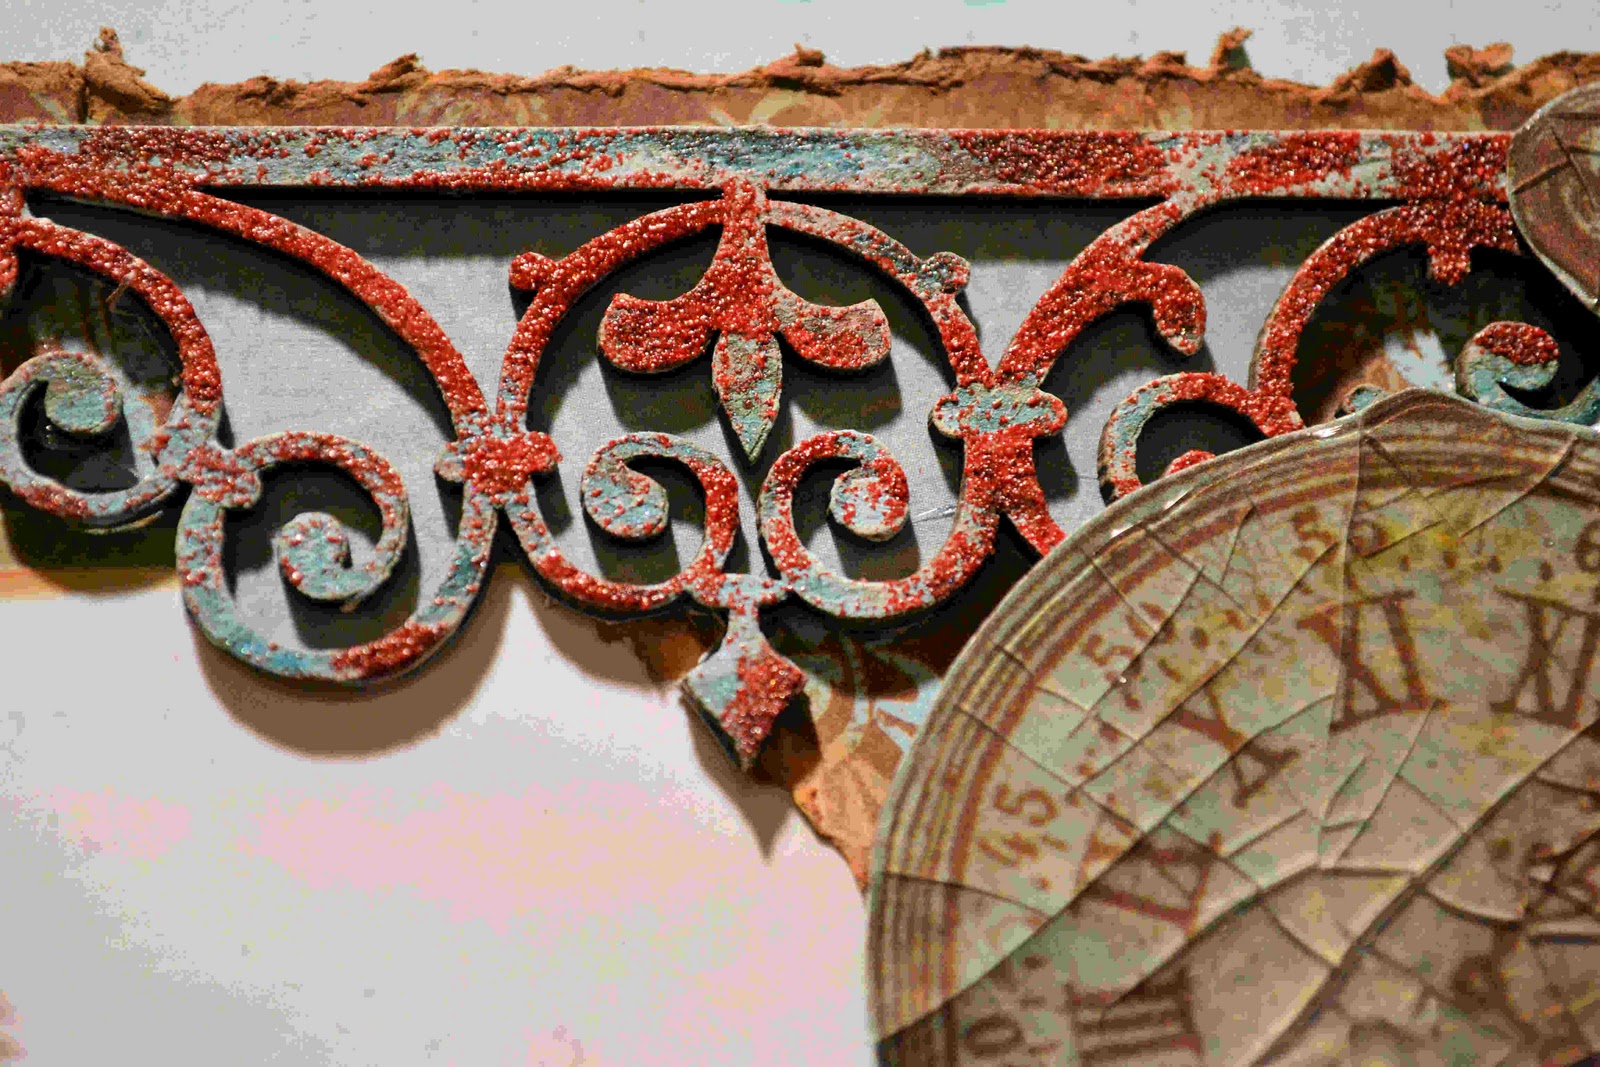
I just LOVE the Wrought Iron Trim Chippie by The Dusty Attic too!  ( DA0547 below) I used the same technique on these 3 pcs as I did on the flourish - but I did not run it through the CuttleBug first.  I also backed all of the chippies on a light blue paper, then cut around the edges with an Exacto Knife, so that they popped and stood out a little on the busy patterned paper.  ( time consuming -but I think well worth it - don't you?!)


The paper watch in the upper right corner was covered with Royal Coat Dimensional Magic, then I bent it to make the crackles. The close up is below.
Thanks for stopping by  - I hope I inspired you! Now get out your needle and threads and have at it!! LOL!!
Happy Scrappin'
Sherri
PS - all of these products were purchased at my FAVORITE Local Scrapbook Store: Scrap-a-Doodle Doo  You can shop them on line 24/7 if you are not in the area - but PLEASE support your LOCAL SCRAPBOOK STORES!

Tuesday, November 15, 2011

Sneak Peek - Nov/Dec Kit of the Month for Scrap-a-Doodle Doo

Hi everyone - I just wanted to share a SNEAK PEEK for the upcoming Kit of the Month from Scrap-a-Doodle Doo!!

I can't wait to get started on creating it for you!

Since we want to offer you something really special for the holiday season, I've been asked to design a Mini-Album featuring Little Yellow Bicycle's Acrylic and Chipboard album; designer papers from Simple Stories' "Year-O-Graphy" Collection; Tattered Angels' Glimmer Glaze; Kaisercraft's Gems and Pearls; Chipboard Doo-dads, etc.

This "Holiday Kit" will be available on November 30th and will take the place of our November and December Kits of the Month.

We will have a limited number of these kits which will sell for $29.99 plus S & H (if you do not pick it up at the store). There will only be one "cutting".

A sample will be at the store with "sneak peeks" online shortly. If you decide that you want the kit, please provide credit card information by calling the store or placing your order online.  201 818 7060


Your kit will include all of the elements in the photo below - Plus complete instructions on how to create an awesome mini album - that you can use to document special photos from last year - or get a head start on 2012 - it is up to you! 

Hey.... This would make a GREAT Holiday/Christmas Gift - either as a KIT or a completed project!!

Get your order in before they are all gone!

Thanks,
Sherri


Monday, October 24, 2011

Shadow Box full view and instructions!!

Hi everyone - I had a great time at teaching this class at Scrap-a-Doodle Doo on Friday night! THANKS to all the ladies who took the class, and/or purchased the kit!  There is ONE KIT LEFT - at the store - it can be YOURS if you'd like it - Please call the store at 201.818.7060 if you would like to purchase it please. Cost is $35.00 plus shipping - or it can be picked up if you are in the local area.


Here is the finished Shadow Box before I added my photo:


And here are a few close ups:


The Kit included: (1) 12x12 Pc Bo Bunny “Et Cetera” ET CETERA, (1) 12x12 Pc Bo Bunny “Et Cetera” CUT OUTS, (½) 6x12 pc Simple Stories Generations “Together” paper,(1) Black Paper Clip,(1) Clear Gem,(4) Metal Flower embellishments, (1) pc Tulle netting, 1 pc brown beaded trim, 1 pc old dictionary paper.


Additional items needed: Viva Decor BLACK Pearl Pen ( or black stickles,) Ranger Distress Stain "Walnut Stain," or any BROWN Distress Stain, and any BROWN INK Pad or CHALK for edge distressing, Tattered Angels Glimmer GLAZE "Indian Summer," Tattered Angels Glimmer MIST "Pumpkin Spice." 3D Foam/Pop Dots, Fabritac Liquid Adhesive., water & Q-Tips, Bone folder. Water spritzer.


FIRST - Paint Glimmer Glaze on all 4 metal flowers and on clear gem - let dry.


Instructions: SAVE ALL SCRAPS - Cut "ET CETERA" paper at 8”x10” with the Black ETC in the lower right corner ( 8” high x 10” wide) INK the edges. Turn the paper over and tear @ 1-1/2" strip down the right side -*Tear BOTH sides of the length of the paper, and tear the 2 short sides to make an @ 8" pc. INK the edges. CUT the Simple Stories "Together" ½ sheet into a 6”x8” pc for frame.(Set aside for now) Cut out the following on the CUT OUTS - "dream" Tag, Black Bingo card, "imagine the possibilities" *cut around fancy edge. Cut out the "B" "I" and "G" from the RED Bingo card. FOR FLOWER - Tear (2) "circles" from the remaining "Together" (1) @ 3"/largest (1) @ 1 1/2"/smallest. Tear (2) circles from ET CETERA (center layers) (1) @ 2 1/2" & (1) @ 2" - INK all edges of all of the above, including the pc of old dictionary paper. Change the "blue" color on the "dream" Tag to orange, by painting with Pumpkin Spice Glimmer Mist (use a paint brush)When Dry - add the "BIG" RED squares.


TO MAKE the Frame - Center a 4"x6" piece of Chipboard on the 6"x8" pc of "Together" paper. Fold up all 4 sides and crease with bone folder. Tear off corners, and tear @ 1/4" off around all edges. Ink edges with Stain, run Q-Tip with stain along inside crease. Spritz edges with water, and ROLL around a pen or pencil. Let dry. Edges will keep their rolled shape.


To MAKE the FLOWER - One at a time - Spray both sides of each of the (4) circles with water. (not too wet -start our lightly -just enough to make them pliable and easy to wrinkle/shape) take each circle and fold up from the center -like into a bud. Unfold edges outward, pinching as you work your way around the circle to give it dimension - *Circles are layered as -Large Together, 2 ETC -large one dark side up, smaller one light side up - then smallest Together in the center. Once they are dry - glue them together and add Gem in the center.


ASSEMBLY: GLUE the 8x10 pc inside the box with Fabritac. Glue the Dictionary page on an angle in the top right corner. Add the strip of the ETC paper across the top @ 1" from the edge *leave a place to slip the paper clip under. BINGO card is glued to the bottom left. Add the brown beaded trim to the bottom of the "dream BIG" tag, with RED LINE tape. Position all remaining elements ( frame, flower, dream tag, metal flowers, Imagine tag) in the box before gluing . Once you have it to your liking -glue everything down. Glue metal flowers with Glue dots & Imagine Tag with POP Dots. Add BLACK Pearl centers to the flowers. Tie a knot in the tulle & add near flower as shown. The photo opening is 4"x6" - I trimmed my photo to @ 3" x 5" by tearing the edge and then inking with brown stain. I also printed it in Sepia with a faux frame/mat. I think it looks really good - BUT- you do NOT have to print it in Sepia - it is all your personal choice.


I hope this inspired you to create something "off the page"


Enjoy!
Sherri