Pages

Showing posts with label LAYOUTS Glimmer Mist. Show all posts

Tuesday, June 16, 2020

SOS - Sketch Challenge - "Chicago Pizza Tour"

Hello Everyone - I hope this post finds you all doing well!  
It is time for this month's Sketch Challenge over at the Scrap Our Stash Blog ! 
We encourage you to play along with us, using the sketch below as your inspiration - and also be sure to use KRAFT PAPER and at least ONE METAL EMBELLISHMENT!!


I decided to scrap a few photos that were taken at the beginning of February - while on a Chicago Pizza Tour, during a sales meeting that I planned for the new company I work for.
Everyone had a great time, and it was a great team building event. We took a beautiful luxury bus to 3 different famous pizza restaurants in Chicago along with a great guide who told us all about each location, pizza facts, and info about Chicago.  If you are ever in Chicago - be sure to check out Chicago Pizza Tours!!  The photos in this layout are from our visit to Flo and Santo's  - famous for their thin crust pizza.  It was really good -but they cut their round pies into squares in Chicago -  very different than the way we do it in New Jersey!

For my base page, I used a piece of Kraft Resist Paper, from a 12x12 pad of Tim Holtz Idea-ology, that I have had forever!!  I then used a TWC Mini Brick Stencil, along with a Nuvo brush and Taylored Expressions Earl Grey Ink to create the brick design in all 4 corners of the layout.   I also used it to ink all of the edges of my papers, including the torn ones - 
I like how it all came out. 
Here are the sales team members who attended the meeting  - It was so great to be able to put faces to names and voices! Everyone was so nice, and the Pizza Tour was really a hit!   
I created a little tag with journaling to tuck behind the photo of the group.
Here is the back of the tag and you can see the metal brads that I added for the challenge.
You can also see the splatters of Glimmer Mist that I used.
More metal brads some FUN metal Flair, and those cool inked/distressed edges! 
(and those square pieces of pizza too! LOL!)
I used different types and fonts of letters for my title.  I love how it turned out!

Thanks for stopping by!  I hope you can find some time to escape and play along with us this month at the Scrap Our Stash Blog!  Head on over there to see more inspiration from the other Design Team members, Contest Rules, Prize Info and where you can link up your layout too! 
I can't wait to see what you will create!!

Items used:
Tim Holtz - Idea-ology Kraft Resist paper pad
Simple Stories - So Rad "Authentic"
My Mind's Eye - Stella and Rose - Hattie n Happy, Polka Dots Paper
PaperHouse - NYC Collection
TCW Mini Bricks Stencil
My Mind's Eye Jubilee and Cut and Paste Brads
October Afternoon - Snapshots Tin Pins Flair
Nuvo Brush
Taylored Expressions - Earl Grey Ink
Jillibean Soup - Mini Alpha - Spicy Social Soup and AlphaBeans - Organic Orange stickers
Ruby Rock-it -Upstairs Downstairs Chipboard Alphas
Glimmer Mist - Jack O'Lantern, Raven, Burnt Red

Tuesday, July 30, 2013

Everyone deserves a little "me" time!

Well, JULY certainly has been a VERY BUSY month for "me!"   I thought things were supposed to calm down a little in the summer months!!  I guess I will have to wait until our beach vacation in August!!

I spent MUCH of my June and July planning and preparing for my youngest son Jake's Graduation Party.  I made the centerpieces and the luminaries that I shared on a previous post, along with a cool Photo Op stand.  ( I'll try to put a post up with pics and ideas of the event in the near future.)

As a TREAT to "me" - the week after the party, I attended a WONDERFUL weekend crop - hosted by Scrap-a-Doodle Doo!   Stephanie and THE DOO CREW always put on a GREAT EVENT - absolutely TOP NOTCH in every way!

The theme was "Down the Shore" - and most of us, being "Jersey Girls," really felt right at home!!  The weather played right along with the theme - as temperatures on Friday and Saturday were in the 90's!!  But we were cool and comfortable in the BEAUTIFUL Crown Plaza Hotel in Suffern, NY.

I had an incredible time laughing and relaxing with friends.  The food was AMAZING - the chef really outdid himself and even gave us a "Clambake" on Saturday night!


And - my good friend Pattie always makes "THEMED" desserts for the event - just look at these ADORABLE flip flop cookies and floating bear mini-cupcakes!!

HOW STINKIN' COOL ARE THEY!!??

SO -keeping with the "me" weekend theme - I've had these 2 photos of "me" that were taken in 2011 when we visited San Diego.  There was a "touch pond" in Sea World, and they had these incredibly beautiful and unusual STARFISH. ( Rarely am I in a photograph, as I am usually the one with the camera, but my son took these 2 shots of me with one of the neat starfish.)   I kinda liked how they came out, and used the get-a-way weekend as my opportunity to PLAY with the photos and the HOT NEW Graphic 45 Bohemian Bazzar paper line that I picked up at THE DOO a few weeks ago.  I just LOVE how very FUN the colors and patterns are!

Here is my "me" Layout:


Lots of layers, colors, textures, patterns 
- YUP!  That's "me!"  :-)

The chipboard piece is from THE DUSTY ATTIC - I first painted it with Ranger RUSTY HINGE Distress Paint - then sprayed it with layers of Glimmer Mist, until I achieve the colors I wanted.  I used Chalkboard INCHWORM, along with some Glimmer Glam DIRTY MARTINI for the green, and added some bling.  The red flowers were sprayed with LED RED, and the little dots on the end of the flowers were highlighted with Aqua Ranger Distress Stickles.

Here is a close up:
l

I used layers of the Bohemian Bazaar Tags and pockets for both the mat on the smaller photo, and behind it as well.  Then, before adding a piece of fishing net under the flower grouping and over the "me" tag on the left side of the page, I placed it in the upper corner right of the yellow and white polka dot base and sprayed it with Glimmer Mist - to act like a mask.  They kind of "mirror" each other and I really think the more solid and darker color behind the Dusty Attic piece helped to "pop" it as well.  I inked the edges of all papers with either Peacock Feathers or Ripe Persimmon Ranger Distress Stains too!


Here you can see some of the fishing net, and the cool large starfish that I stamped on Bazzill swiss dot orange paper -then heat embossed with cranberry embossing powder.  Can you see the starfish I am holding?  I think it came out pretty close don't you?!!   I was so happy with it, that I made 2 of them and used them both.   Then  I added the real little red starfish was from my friend Pattie -who had a jar of Mud Puddles Sea Life collection and kindly shared her little red starfish with me :-)  The flowers are from my "stash" but are mostly PRIMA I'm sure!  ( LOVE PRIMA FLOWERS!) Can you see the little resin Prima Light Bulb that says "ME" hiding amongst the flowers?


I've had the tag that I used in this layout in my stash for some time - I had Glimmer Misted it with yellows and oranges using a mask  when I was just "playing around" and never found a place to put it.  I thought it worked well with this layout, and added some PRIMA Canvas letters that I painted with Glimmer Mist Chalkboard "Inchworm" and then outlined with a fine point Sharpie Marker.  I added this cool Turquoise and Green fringed ribbon that I got from a cute little Esty Shop called Hydrangea  Hippo, and there are also 2 sprigs of green and clear "Bling Spray" that I purchased from there as well.

So there you have it - my "me" weekend and layout.   I hope I've inspired you to play with lots layers, colors, prints and textures and to most importantly - do something for yourself!  Everyone deserves a little "me" time!

((Hugs)) ~ Sherri

Thursday, November 17, 2011

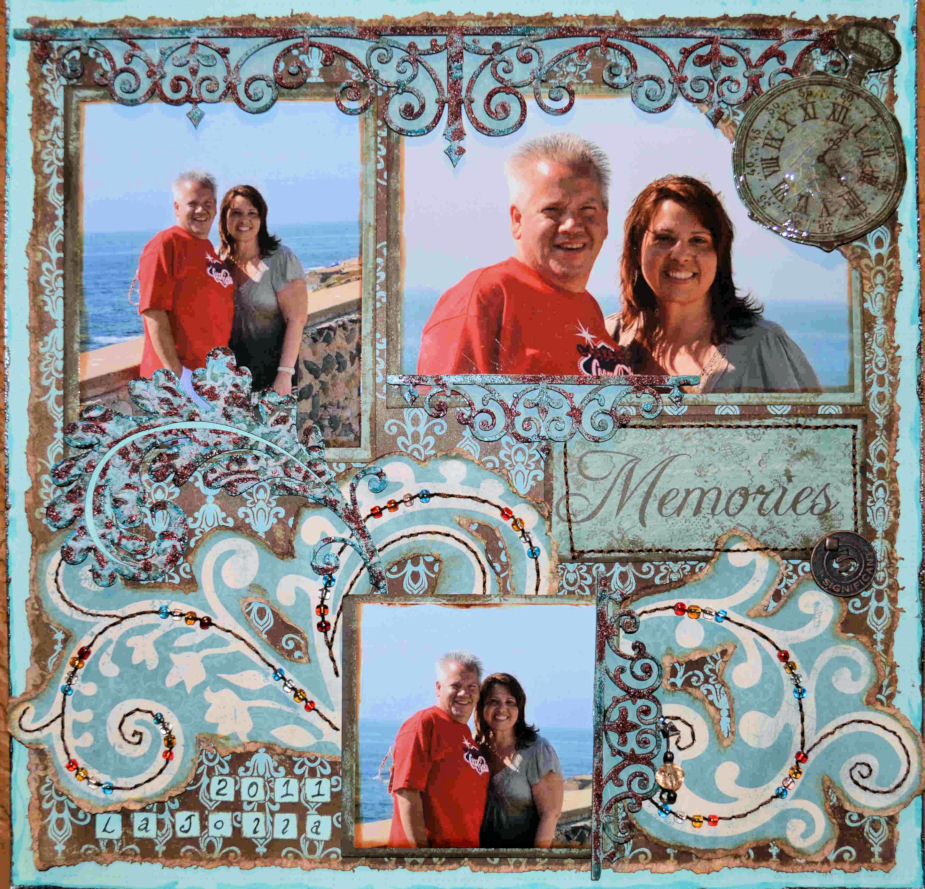
Beautiful La Jolla


Hi Everyone - just wanted to share this layout with you.  It is my first real attempt at stitching - and it was so much FUN - I hope it inspires you to try it.  I didn't use a template or pattern - I just pre-poked holes along the swirls as evenly spaced as possible and stitched away!  Of course I couldn't "just stitch" so I added a few beads to the stitching to tie in the red of my hubby's shirt.

I am sorry, but I do not remember the name of the paper line that I used. I selected it from my "stash" as I thought the blues and browns really picked up on the beautiful colors of the rock wall and the Pacific Ocean.  This picture is from our summer vacation, when we were in beautiful La Jolla California for the day. 

I actually only used 3 pcs of paper. The swirls were cut out of the center of the blue paper you see as the beginning base.  The brown and blue pattern is paper # 2, and the word "Memories" the watch and the paper behind the chippes was from piece #3.

I used a water tearing/distressing technique to "cut out" the paper swirl designs from one piece of paper, and along the edges of the brown and blue pattern sheet too.  Those edges were further distressed with Vintage Photo Ranger Distress Stain ( one of my new favorite products!) 

I also wanted to show you how much fun and how versitale Dusty Attic Chippies can be -(this big one is called Foliage DA0506) -  I ran it through my CuttleBug first to give it texture. I gave it a light/thin coat of gesso then sprayed it with Patina Glimmer Mist, and added some Mermaid Glimmer Glam, along with some Waterfall Glimmer Glaze -"here and there."  To tone it all down and make it a little more rustic, I used Ranger Distress Embossing powder in Fired Brick to add some more RED to the layout.


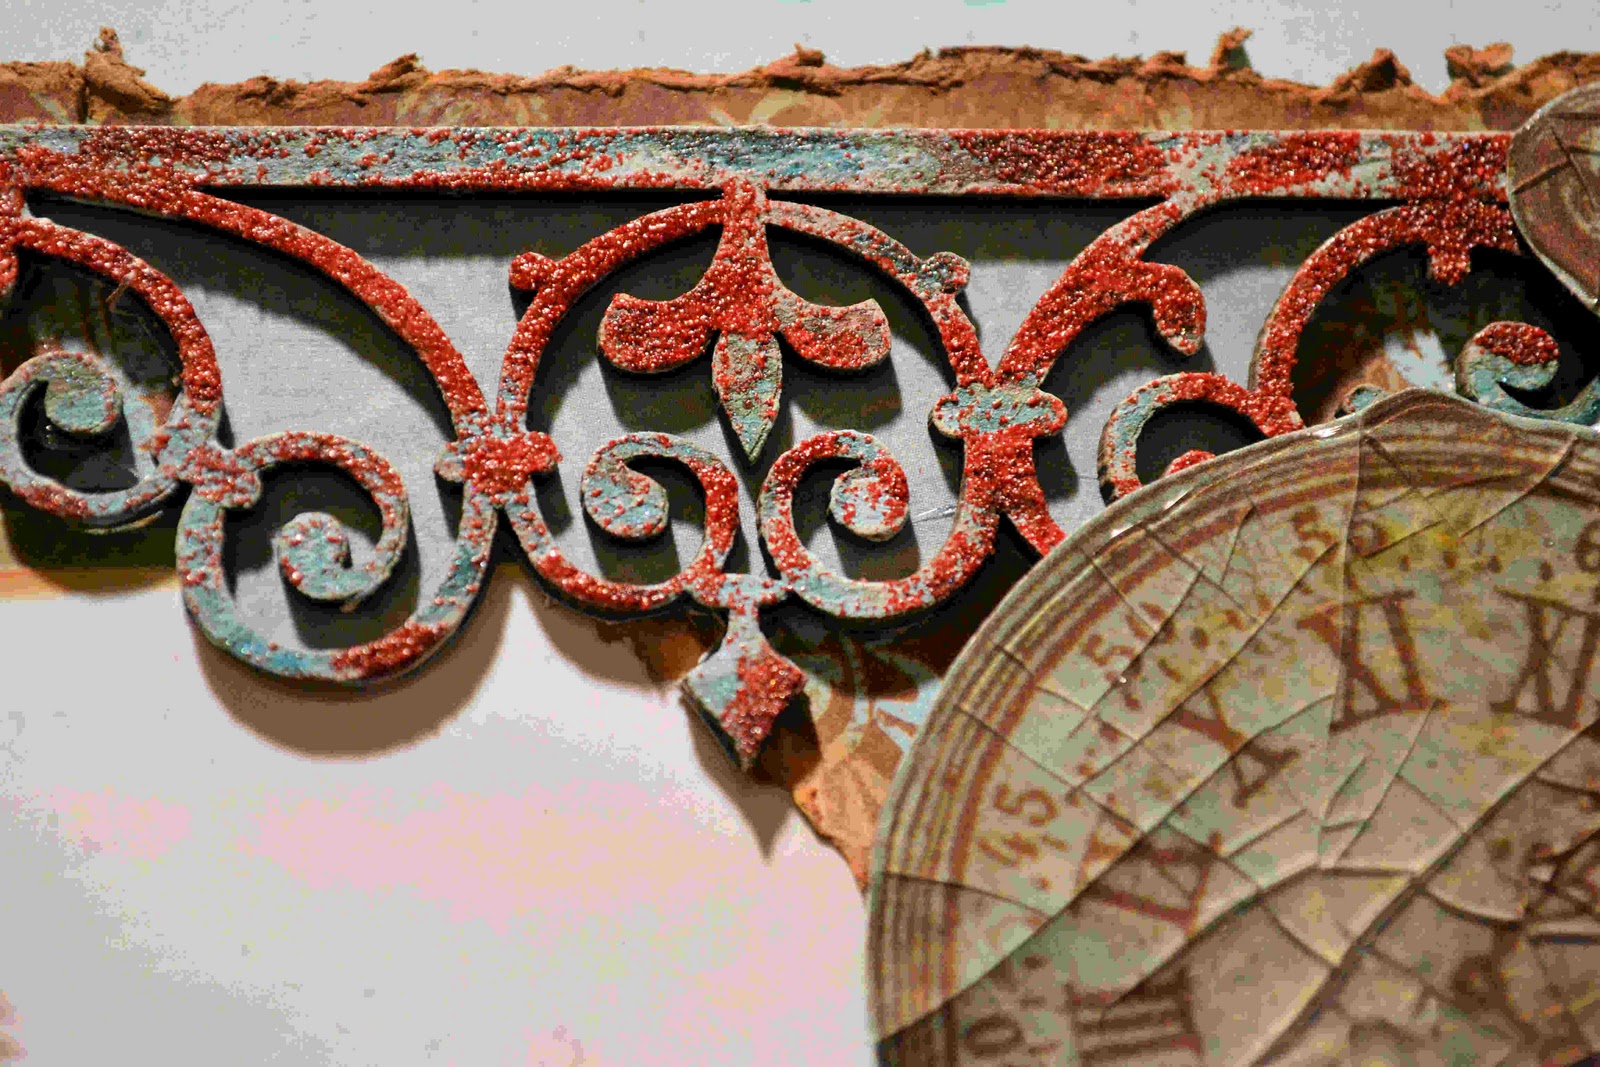
I just LOVE the Wrought Iron Trim Chippie by The Dusty Attic too!  ( DA0547 below) I used the same technique on these 3 pcs as I did on the flourish - but I did not run it through the CuttleBug first.  I also backed all of the chippies on a light blue paper, then cut around the edges with an Exacto Knife, so that they popped and stood out a little on the busy patterned paper.  ( time consuming -but I think well worth it - don't you?!)


The paper watch in the upper right corner was covered with Royal Coat Dimensional Magic, then I bent it to make the crackles. The close up is below.
Thanks for stopping by  - I hope I inspired you! Now get out your needle and threads and have at it!! LOL!!
Happy Scrappin'
Sherri
PS - all of these products were purchased at my FAVORITE Local Scrapbook Store: Scrap-a-Doodle Doo  You can shop them on line 24/7 if you are not in the area - but PLEASE support your LOCAL SCRAPBOOK STORES!

Thursday, June 9, 2011

Beach Donuts!!

What?
Donuts on the Beach??? 
Yes!!  ~ That's how they do it in Sicily! !

Hi everyone -I hope you are finding a little relief from the HEAT WAVE we are having here in the northeast - or that it is cool where you are!!  Thanks for stopping by!

First, a little background on this photo and this layout - We went on a Disney Mediterranean Cruise back in July of 2007.  Needless to say, I took LOTS and LOTS of pictures.  I am NOT a "quick get it done" kind of scrapper. Now, there is nothing wrong with that - and I kind of envy those that are, but it is just not me - I know, accept and embrace the fact that I will "NEVER BE DONE!"

I scrap photos when the "mood" hits me - or I am inspired by something -and that "something" on this layout was the Fence (which I had in my scrap "stash" for years, and recently "found" again!) and  those little ADORABLE Donut Embellishments, by Jolee's Boutique/EK Success - Which I purchased - like all of the rest of the items used on this layout - at no other place than my FAVORITE Local Scrapbook Store - Scrap-a-Doodle Doo !

So - the "story" behind this layout and photo is... We went on a DCL excursion while in Palermo, Sicily to Mondello Beach, with a bunch of other cruisers.  We were direct to a fenced in area where they must "deposit" cruise tours all the time.  On the other side of the fence was a sidewalk that lead to the road and to town.

The day was HOT, the beach was beautiful, and there was a bakery nearby that sent one of their workers over to the beach with a box of fresh, delicious, AMAZING donuts.  I must say - it has been almost 4 years and our family still swears that those were THE BEST donuts that we ever had!  I just LOVE this picture of our youngest son Jake enjoying the donut, it captures that great memory!

Another memory of that day ( here is where the fence comes in!) was that while sitting on a beach chair, reading a book, I looked up to see a young guy going through the pockets of a pair of shorts that a fellow cruiser had hooked to the underside of his beach umbrella.  I remembered it had been a young family with 2 small kids sitting there - and this guy was NOT the owner of those shorts - nor of the camera he was taking out of the pocket!!  I started to scream at him "HEY!  That's NOT your camera!  Put it back - it's not yours!!!"  and he started talking to me in Italian ( like I could understand - right!! LOL!!) and was not putting it back!  I then took my beach towel and started swinging it at him - yelling the whole time for him to PUT IT BACK!!  I didn't even think about how crazy it what I was doing was, just that this guy had some nerve to take this family's memories from them!!  Everyone around me just watched - and the guy finally jumped the fence and ran off down the sidewalk to town!  Phil was not happy at all with me for my "brave" - alright -kind of stupid actions - this was a thief in Sicily I was "dealing" with - and it wasn't even my camera !! I was not happy that everyone sitting around me did just that - sit and watch!!  The poor family lost all of their photos that were taken on the cruise up to that time - was not happy with their loss either - even though it was pretty stupid to leave it hanging right there in the open.  SO - that is my silly fence story and why it is included in this layout! 

Now - onto the layout ( If you've stuck with me and through my rambling so far! LOL!!)
The BASE of this layout is one of my favorite new finds - a 12 x 12 glazed chipboard sheet! This one is by BAZZILL and has glazed polka dots.   First - I brushed white acrylic paints "here and there."  Then I used Tattered Angels Chalkboard Glimmer Mist in POLKA DOT PINK , INCHWORM, ALASKAN SALMON, TEAL HIGH HEELS, and GRAPE APE and wiped it back a little, off of the glazed circles.

I then inked the edges of the base, and the torn edges of the large polka dot paper ( it was a give away at the DAY at the BEACH CROP that I attended the day I made this layout ( hosted by Scrap-a-Doodle Doo ! )
with Quick Quotes Powder Puff BLUE HAWAIIN Chalk Ink - ( LUV this Stuff!) and glued it onto the base on an angle. 


Can you see the cute donuts in this photo? - and a close up of my son Jake enjoying the real one?!
The FENCE was a find at one of the big box stores around here from a few years ago. I included the "tickets" from the excursion, and thought the seashells looked nice in that corner ...shhh... don't tell, but they are not from Sicily -but that can be our little secret - okay?


Here you can see a photo I snuck in behind the journaling tag (that I painted around the edges with the INCHWORM and TEAL HIGH HEELS Chalkboard Glimmer mist.)  It is a picture of a post that we passed when we got back on board the Disney Magic. I guess people thought it seemed that the thing "to do" when you returned from a shore excursion, was to take off your MICKEY EARS sticker, that had your group/tour # on it, off of our shirt and add it to this post -- It really made a cool photo opp, so I had to include it too!

Here is a close up of the fence -  It was a natural wood with white wire connecting.  I "hit" it with a little white acrylic paint "here and there" and then sprayed it with Tattered Angels Chalkboard Glimmer Mist, INCHWORM, and TEAL HIGH HEELS, then a little Sugar Maple Glimmer mist  -brushed on with a paint brush - I added a little BLUE HAWAIIAN Powderpuff Chalk haphazardly too!
I LOVE how it came out - I hope you do too!

Thanks for looking -and if you reached this point - THANK YOU for sticking around through all my rambling - I hope you take away a little inspiration for one of your beach layouts this summer!

Please don't be shy - feel free to leave a comment - and say HI!
Thanks,  Sherri

Saturday, May 21, 2011

Your SMILE!

Your Smile makes me HAPPY, Your Smile makes me PROUD and

May your SMILE open doors to your DREAMS!

Our son Nick graduated from Franklin Pierce University this past weekend - Magna Cum Laude!!!  with a BA in Mass Communications ( Media Studies / Media Production)

I CAN NOT begin to tell you how PROUD we are of him!

This photo was take at the Honor's Convocation Ceremony that was held on May 6th.  It is not the best quality photo, as I had to take it with my cell phone - because while I remembered my camera, I left my SD card at home in the computer!!  I changed the color and style in photo shop, and even though it is a little blurry, his SMILE shines through, and I am happy with the results!

I made this layout to remember that special day.  I had hope to enter it into the Polkadot Door Design May Inspiration Challenge - and thought the cut off day was May 18th - BUT  it was actually May 15th - so I was not able to submit it. - That is OK - I love the "challenge" of a "good challenge" - and the work that is created out of it - I hope you like what I came up with!!


For the challenge ( that I missed! - Oh well!)  - the RULES were: Create a paper crafting project (card, layout, off-the-page item), based on provided inspiration (photo, sentiment, or element : crocheted flowers).  Here is the photo for inspiration:


I incorporated the pinwheel, crocheted flower and SMILE from the inspiration, and I LOVE how this page came out!  The Basic Grey CURIO Line is just beautiful, and I had so much fun using it again in this layout.

All of the INGREDIENTS can be found on my post to my Scrapbook.com Gallery and were purchased at Scrap-a-Doodle Doo

I LOVE the base of this Layout - it is Bazzill's Glazed Chipboard "Grandma's Damask" sprayed with Tattered Angel's GLIMMER MIST in Maple Sugar and Turquoise Blue - then edged with Tim Holtz Ranger Distress Stains in Wild Honey.  All of the torn edges were torn and folded with a water distressing technique, and inked with the Wild Honey too!  If you look below, at the bottom, middle of the photo you will see that I added an old dictionary page with the words "graduate" and "graduation" on it ( after I sprayed it with a little GLIMMER MIST in "Old Lace!"
HERE is a Dusty Attic Chippie (from DA0506 Foliage)- I first ran all the chippies through my Cuttle Bug with the TEXTILE distressing folder - I then inked this one and the smaller one in the bottom left corner - up real good with Quick Quotes Powderpuff "Tahiti" Chalk - then some Ranger Distress VersaMark, and some TeaDye Ranger Distress Embossing powder - hit is with my heat gun - and then brushed some Dried Marigold Distress Stickles on the brown spots - after that had dried - I painted on some Tattered Angles TIDE POOL Glimmer GLAM - I am LOVIN' how it can out and REALLY LOVIN' playing with Dusty Attic Chippies!

The Pinwheel was made by tearing paper  ( All the paper used in this layout are Basic Grey's CURIO Line)  The edges were then inked with the Tim Holtz Ranger Distress Stains in Wild Honey. There is another little DA Chippie from the same set in this bottom left corner - along with a crocheted flower that a friend made, and that I "painted" with a little "OLD LACE" Tattered Angels Glimmer Mist. The FILM Strip "Ribbon" is from Tim Holtz Idea-ology, and the camera eyelet, and "Explore" brad have been in my scrap stash for a while!

Can you see the lace on the right - by the DREAM Tim Holtz Ticket?  I got that while on a B'day get-a-way weekend with my hubby last June!  I love having it "peak" out from the torn area's on the page.
The SMILE letters are Maya Road chipboard alphas that were colored with Quick Quotes Powderpuff "Tahiti" Chalk, then some Distress Dried Marigold Stickles, and finally some Tattered Angles TIDE POOL Glimmer GLAM to make the word POP!  I think it does - do you!?

This pretty little swirl chippie is from the same DUSTY ATTIC collection - there are 2 - on on top and one on the bottom of the photo.  First I ran them through the TEXTILE embossing folder - then I inked it with the Tim Holtz Ranger Distress Stains in Wild Honey, then I hit the top ridges with Powderpuff BLOODY MARY chalk ink -then I sprayed them with TATTERED ANGLES Old Lace Glimmer Mist.  After it had dried - I then gave it a nice heavy coat of ROYAL COAT Dimensional Magic
OH - do you see the STITCHING along the left and right edges of this Layout??  all done by hand - thank you very much!! There is also BLACK "FAUX" Stitching on the brown flower cutout under the photo!

Here is a close up of my little friend - the CHIPPIE!  Seriously - you have GOT to get some of these and try playing with them - LOTS of CREATIVE FUN!!

ALSO.....


MANY THANKS to my TALENTED friend NATASHA whose inspiration got me additicted to water distressing - and now stitching on my layouts too!! Click on her name and check out her BLOG - but be prepared to wipe up the drool off your keyboard, as her work is AMAZING!  Oh, and while you are there - please leave her a little "blog love" (comment) and tell her I sent you!! ;o)


I am also entering this layout in a contest for Scrapbooks etc. February 2012 On Assignment Challenge
Boy/Girl Page, using Girl/Boy Product - so this is a BOY page, and I used "GIRL" product : Antique Lace, Crocheted Flower, flowered paper, Prima "Say it in Pearls" with mini roses and some BLING! Also some Glitter and Glimmer too! WISH ME LUCK!! Please head over there by clicking on the link and leave a like or a comment there if you would be so kind too! 


Thanks for looking ~ I would LOVE it if you would be so kind as to leave me a little BLOG Love - so I know you were here......

All the Best!
Sherri


Wednesday, May 4, 2011

I LOVE Dusty Attic laser cut embellishments!

I went to a wonderful weekend crop, hosted by SCRAP-A-DOODLE DOO this weekend, and had a BLAST with my scrappy friends ( as always!) I finally had a chance to play with some DUSTY ATTIC laser cut embellishments! ( and lots of other goodies too!) I have to tell you I am HOOKED!!  They are so much fun, and are a blank slate - just waiting for you to make them your own and customize them for your layout or project!  Ya gotta try them!!

ALL of the items used in this layout were purchased at SCRAP-A-DOODLE DOO too!

Our son Jake took this photo of my hubby and I, while we visited EPCOT this past December - I loved the colors, and couldn't wait to use the photo in this layout!   I have to THANK my friend NATASHA for all her inspiration and tutorials, and for sharing of her ideas and AMAZING talent!  Check out her BLOG to see her AWESOME WORK!!


I used layers of Basic Grey's Curio Collection that I water distressed, tore and folded, along with Core'dinations Black Magic, and LOTS of embellishments!

I LUV this Dusty Attic Swirl!  I actually cut off a piec of it and added it at the bottom of the picture too! I inked the leaves with Peeled Paint Distress Ink, the Birds with Faded Jeans Distress Ink, and the vine/swirl with Fired Brick Distress ink. I added Waterfall and Orange Crush Glimmer Glaze by Tattered Angels, along with Espresso, Be Positive, and Mermaid Glimmer Glaze, then some Shabby Shutters, Vintage Photo, Dried Marigold and Frayed Burlap Distress Stickles! This stuff just LOVES layers and adds so much to your page  ( you can find it at Scrap-a-doodledoo.com too!)


I first inked the Dusty Attic Hinge with Fired Brick Distress Stain, (love this stuff too!) then a coat of Tattered Angels' BE Positive Glimmer Glam, and finally some Vintage Photo Distress Stickles. The pearls for brads were made with a Bronze Pearl Pen - the brown "lace" is paper that was water distressed inked and folded. I used up lots of the Tim Holtz embellishments that I've been "collecting" too!


Ouchless Cardboard is my "friend" and a great base. I added a little white acrylic paint, then some Espresso and Be Positive Glimmer Glam. I added some Bronze Pearls from a Pearl Pen to the faux lace, and a little sneak piece of real lace in there too! - look at that luscious Dusty Attic swirl too!


This flower was made out of beige cardstock, that I cut out on the Cricut - I used Natasha Aguirre's Gardenia Flower technique, inked the edges with Mocha Mama Powder Puff Chalk, and used a paint brush to add some Sugar Maple and Turquoise Blue Glimmer Mist, and topped it all off with Dried Marigold Distress Stickles.  The Corrugated Kraft Alphas  by Jillibean Soup were inked up with just about all of the Glimmer Glaze and Glam previously listed, along with some Mermaid Glimmer Glam for added sparkle!


Here is a side view of the flower - I love how it came out!  Layers are my friend - if you haven't noticed!  Check out Natasha's tutorial on her blog -the flowers are FUN to make too!  Oh - and THANKS to my good friend Pattie for sharing her costume jewelry, I love the dimension and texture it adds to the layout too!

Well -I hope you like it, and it inspires you too! 

PLEASE go ahead and leave me some LOVE - I'd like to know you were here!

Thanks,
Sherri


Thursday, April 7, 2011

A Wonderful Day in NYC with Friends and NO CELL PHONES!

Last September, I was invited to accompany my good friends to a taping of the new Nate Berkus Show in NYC!

DISCLAIMER - before reading further - even though we all live in New Jersey, and are only about 20 minutes from NYC - (with NO traffic that is - LOL!!)  - we are all not big frequenters to "THE CITY" - so this was pretty much a BIG ADVENTURE!


We got up early and headed over the bridge - THANK YOU Marianne for driving!!  It was a chilly morning, but we found parking around the corner from the studio entrance, and after reading all the "rules" for audience members on-line before we went - we decided to lock our cell phones in the glove box of the car - as they pretty much said "no cell phones or cameras allowed on the set - they WILL be confiscated."  This was confirmed as we were handed our tickets, while waiting on line, as the back of the tickets said pretty much the same thing.


We were finally allowed to enter the "holding room" where there we many other people - who had cell phones!!!  We asked a crew member - and they said - "Oh you can have them - as long as you turn them off!"  UGGH!!  - Oh well - so much for playing by the rules!!


The holding room had coffee, water, bagels, coffee cake, and a large plate of bananas -seriously - there had to be over 50+ of them ( kind of odd huh?) We were given some forms to fill out - and then waited to be brought into the studio for the show's taping.
On the way out the door - I noticed ALL OF the bananas were gone! ???? Huh????


Well once in the studio - we were "strategically placed" They told us where to sit, and moved people around frequently during the show. There was a great comedian / MC  there who was in charge of warming us up!  Her name is Dena Blizzard, and her apron read "One Funny Mother!" and she was! In the course of the filming  - she would keep us busy during the breaks.  At one point she asked - "OK - raise your hand if you have a banana in your pocket book. Come on - we know you took one - just fess up!"    You had to see all the hands that were raised - LOL!!  Then she proceeded to hand out stickers to the "offenders"  that said "I stole a banana at the Nate Berkus Show!" That is when the scrapbooker wished I had grabbed a banana as I was walking out the door - I probably would/should have if my pocket book was bigger, and there were any left - as we were hungry when the taping was over!! LOL!  Oh well, - no sticker for the "good girls!"


The show was OK - it was one of his first tapings - and there were no gifts or prizes handed out at that time, and I never even got to see it, as it aired within a week or so after taping, and they had said to watch for it in like 4-6 weeks - so I never saw my "debut" on national TV!  oh well again!! LOL!!


BUT the BEST part of the day - was spending it with good friends - and the CRAZY feeling of being "LOST" and really "DISCONNECTED" in the BIG APPLE!  

Like I said - our phones were in the glove box, in the car, in the bottom of the parking garage, down the street, and around the corner. With NO BANANAS to hold us over - we were HUNGRY! - SO....what to do?  We decided not to go back to the car and waste any of the precious time we had left before we headed home before RUSH hour - AND - (we thought..) people survived without cellphones "back in the Olden Days" - right?  We are WOMEN - and we CAN DO ANYTHING - right??

So - here we are - NYC - PHONELESS!!! I have to say - I did feel a little "naked/vulnerable/armless" all of the above??  It was really kind of strange being so disconnected - but then again - it felt kind of FREEING and like we were on an ADVENTURE!  (right?)

Now - where to go for lunch?  Like I said - we are not NYC "savvy" so I asked one of the people from the studio - and they said "If you like Italian food - go to Carmine's" - OK - I've heard of Carmine's and I'm from JOISEY - so we just need to get in a cab - tell the cabby, and he'll take us there  - right?  WRONG!!!  The cabby didn't speak English ( what were we thinking) and told us to call for the address - we then told him we had NO CELL PHONES - so he handed us a map and wanted us to "point" where we wanted to go - like we knew!!  He even gave us his cell phone to use - nice guy - but it didn't work!!  Marianne had an idea where it was, so we just had him drop us off somewhere near where we thought we needed to go. (right!)

We walked around a little - and tried to find a pay phone to call for an address to give a new cabby - did you know it is very hard to find pay phones in NYC!!!  That is when I saw a VERIZON store - and went in - told them our story, -- Nate Berkus, No Cell Phones, blah, blah, blah  ( they really couldn't have cared less) and could they please look on their computers for the address for Carmine's - which they nicely and promptly did!!  (Thanks Verizon guys!)  We hopped in a new cab - with an address - and were there about 20 blocks later!

After enjoying a delicious lunch - we had to figure out the tip on our own - as when we reached for our phones/tip calculators - we again felt the separation - I mean "freedom!"

Next - what do scrapbook buddies do when they visit a "new" place? - why, they visit a scrapbook store - what else!  We had the name of a store we wanted to see and address - and can you believe it - it was only about 2 blocks away from Carmine's! -- WHAT LUCK! ( See - who needs a cell phone!)  So a little stroll down the street and we ended up at Portrait Bug Studios.  It is a small little scrapbook store -concentrating more on photography.  We were able to find a few little scrap goodies (surprise, surprise as my husband would say) - and they offered us a FREE sitting with a FREE 4 x 6 photo - so of course we said YES!  

Remember - we are Scrapbookers - in NYC - with No Phones - and No Cameras - we needed a record of our ADVENTURE - and they were offering us one - and for FREE! 

So - here is the layout I made with the picture - I am sorry - but I can't find the paper where I wrote down all of the in products I used - I'll note the ones I remember - but if you have any questions about anything - ask away and I'll try to find out! 

If you've stuck with me for this long - FINALLY - here is the Layout!  I hope you like it!

I just LOVE the colors - and the picture came out very nicely too!  Don't 'cha think!?


WOMANITY - this is a fragrance I received for Christmas - by Thierry Mugler - I LOVE the scent and I LOVED the box, and all of the great messages inside of it - so I cut it apart and used it as different embellishments for this layout.  FROZEN LAKE and COSMOS PINK and PASHMINA GLIMMER MIST by Tattered Angels - were painted around the edges of pretty much everything, the LACE is from Gauche Alchemy - I think the BLING is PRIMA

I LOVE painting with Glimmer Mist - around the ticket, on the edges of the scalloped teal paper that I journaled on, on the Bazzill circle that used to be white!

Can you read the WOMANITY card? 
It says:
A SYMBOL of recognition that unites all women.
A quest to CREATE a different world.
A CONVICTION that anything and everything is possible
A DESIRE to reinvent yourself each and everyday.
Can you recognize yourself in WOMANITY...?

I used the tissue paper that came in the box behind the photo and circle,
some more bling, and I LOVE this little message too:

Womanity is the new face of femininity. It is the portrait of women who are different, remarkable, unique and diverse. From this connection between women, emerges an exciting fusion, a moving force and vital energy that brings constructive changes.


The flowers were hand crocheted by my friend Debbie - THANKS Debbie!
Their centers are off of some bling that I've had for years.
The butterfly was plain - and I "JAZZED" it up with some GLIMMER GLAM and GLIMMER GLAZE by Tattered Angels too!

 I hope that this gives you some inspiration and that you like it!

Leave me some LOVE if you do!
Thanks,
~Sherri