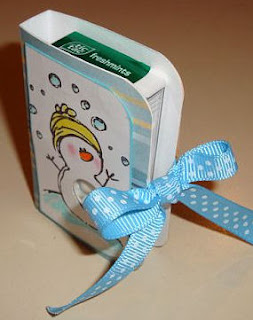
UPDATE - AUGUST 22, 2012 - I am AMAZED!!! - There have been close to 1000 views of this post since Nov 2011! ( 937 today to be exact!) ALSO -when you Google "Tic Tac Holder" THIS is the first post to come up! Cool!!!
There have been clicks from all over the world too!! EVEN COOLER!!
What I would REALLY APPRECIATE is if you have found yourself here, and if YOU APPRECIATE this post and info - just take a minute to post a little BLOGGY LOVE and leave a comment - even if it is just a
"HI from _________" (wherever you live) ~ THANKS! Sherri
P.S. Feel free to browse around through my posts for inspiration, and "FOLLOW ME" or "SUBSCRIBE" if you'd like to see more from me!
***************************************************
So I've noticed that there have been A LOT of hits on my old Snowman Tic Tac Holder post - and I realize there are no Instructions included!!!
This was one of the first classes that I ever taught - and it really is a cute idea -a perfect little "somethin' - somethin'" for the Holidays! SOOO I dug through my "archives" LOL! - and found the info to share!
HERE is the DEAL though - in return for sharing this with you - I would LOVE to receive a comment to this post!
Just say HI - and to "MAKE MY DAY" I'd LOVE IT even MORE if you would become a FOLLOWER to my blog - and the icing on the cake would be if you were to share this post -and invite your friends to follow me too!! - OKAY???
So - here you go....
SNOWMAN KISSES TIC TAC HOLDER I used a stamp set from Close To My Heart (my website is http://www.scaramico.ctmh.com/ ) They are no longer available - but I am sure you can use any snowman stamp that has a nice round belly!
TO make The Cover:
**Cut 1 piece of card stock 1 3/4”x 2 ¾” and set aside ( snowman panel)
Cut 1 piece of card stock 4 1/2" x 3".
Cut 1 piece of patterned paper 4 1/2" x 3"
Score each of these piece 2" from the left edge, and 2" from the right edge (you will have a 1/2" spine in the center of each piece of paper).
Cut a piece of coordinating ribbon about 14" long and glue it down to the center of the back of the patterned paper (side to side - opposite direction of scored spine).
Glue the patterned paper to the cardstock – the ribbon will be sandwiched between them.
Decorate the snowman panel ( 1 3/4" x 2 3/4" piece of cardstock) ; stamp the snowman, and color in and add Prisma Glitter ink the edges -etc...
Punch out the snowman's belly with a circle punch. Position on the cover and punch the same hole on the cover .
Stamp or write "to" and "from" inside the cover on the left hand side and stamp a few snowflakes there and on the poem too.
The Tic Tac Container:
**Peel the label off the container front, top and back. (OPTIONAL!!!)
**Use rubbing alcohol on a cotton ball to remove the stamped date. (OPTIONAL!!!)
**Print the Snowman kisses poem either on cardstock or computer paper and adhere it to the Tic Tac box.
**Adhere the Tic Tac box to the cover with a glue dot, or double sided adhesive.
Here is the poem to include - I just printed it out on cardstock and stuck it to the Tic Tac box.
Snowman Kisses
He’s cute, cuddly
and full of good wishes.
He wants to give you
these snowman kisses!
XO
Here are some extra photos. Hope you have fun! REMEMBER THE DEAL THOUGH - Please leave a comment and FOLLOW ME - and don't forget to SHARE the Scrappy LOVE!
Thanks!
Sherri


