
You can check it out HERE <----go ahead and click! (but please come back here to see the details, tips, and my 2nd layout too!)
I am so exited to be able to share this Good News - and the 2 layouts that I created using the BRAND NEW ( and ADORABLE!) We R Memory Keepers COTTON TAIL Collection!
Just a little background about me for a minute if you don't mine....
As some of you may (or may not) know - I am a "late in life" scrapper - I didn't start scrapbooking until my children were @ 10 and 15 - and some of you also may know that I am NOT a fast scrapper.
As some of you may (or may not) know - I am a "late in life" scrapper - I didn't start scrapbooking until my children were @ 10 and 15 - and some of you also may know that I am NOT a fast scrapper.
I realized LONG AGO - that I will NEVER be "caught up" or even "up to date" in my scrapping - so I've let all of that "angst" go - and I now I just scrap to CREATE and work on what makes me Happy and feel GOOD at the time! Whatever moves me - or mood I am to do. To me - it is all about taking the time to honor and cherish special memories, and enjoy the creative process while doing so. ( Okay - Okay - I do secretly envy those of you that are up to date, and have all those beautiful photos of your kids scrapped since birth - but ( deep breath inserted here) I realize that will never be me - and will move on and along with my "scrap what you feel method," and enjoy every minute of it! LOL!!)
OK - if you are still here - and reading this (THANK YOU) you are probably asking yourself "Why does she think I need to know all that - and what does it have to do with Guest Designing for We R Memory Keepers??"
Well, you see, when Jenny from WRMK emailed me with the GOOD NEWS that I was selected to be a GUEST DESIGNER! on their Facebook page, and that she would be sending me some goodies from their new Cotton Tail Collection - I took a peek at the line and then said to myself -SOO CUTE - BUT - "YIKES !!- Easter Bunny Stuff !!"
You see, my "Boys" are now 23 and 17 - and I was not the most "diligent" photographer back when they were little guys and when Easter took on a bigger celebration. While I thought the Collection was beyond adorable - I wondered "What the heck am I going to do with these papers?"
Ahhh... I guess it is a good thing that I am not an up to date scrapper - RIGHT??!! LOL!
So, off I went to the dresser in the basement where I store my un-scrapped photos from years gone by ( I know, I know - not the best way/place to keep them -sorry! Hope I didn't make you cringe!) and I spent a good 1-2 hrs going through them - looking for just the right photos for these BEAUTIFUL Papers! I must say - I had the most enjoyable time doing so - and could have spent another 2 hrs down there reminiscing!
Well, I had to go "way back in time!" to 1995 and 1996. I sincerely want to THANK We R Memory Keepers for giving me the opportunity to scrap these very special and precious photos ( and save them from their banishment in the basement LOL!!)
Here is the cool Cotton Tail Scrappy Stuff that came in the box from Jenny at We R Memory Keepers:
 |
| Isn't this collection ADORABLE! |
Below is my first completed Layout that is FEATURED on their Facebook Page. I used the following papers / elements:
WRMK "Cotton Tail" ENGLISH GARDEN (diecut) on top of a page of THICKET. * I cut the center of THICKET out -and used it to STAMP the flower shapes from the acrylic stamps that were included. I cut those out and inked the edges of them. I broke out my stash of buttons and added some of those along with some felt embellishments from Close to My Heart. (yes, I sewed the buttons on to the page - I just can't do buttons without thread) I inked the edges of the papers with Ranger Distress Stain in Dusty Concord too. The yellow letters are foam and are from Thickers. ( The purple and white pearls on the trees are from my friend Marianne!)
WRMK "Cotton Tail" ENGLISH GARDEN (diecut) on top of a page of THICKET. * I cut the center of THICKET out -and used it to STAMP the flower shapes from the acrylic stamps that were included. I cut those out and inked the edges of them. I broke out my stash of buttons and added some of those along with some felt embellishments from Close to My Heart. (yes, I sewed the buttons on to the page - I just can't do buttons without thread) I inked the edges of the papers with Ranger Distress Stain in Dusty Concord too. The yellow letters are foam and are from Thickers. ( The purple and white pearls on the trees are from my friend Marianne!)
 | |||||||||||||||||||||||||||||||||||||||||||||||||||||||||||||||||||||||||||||||||||||||||||
| My oldest son Nick ( top left) was 7 at the time - snazzy tie and purple socks huh?! My youngest son Jake (top right photos) was 1 1/2 that Easter -and as you can see, he was always in perpetual motion! LOL! The bottom photo includes my Dad, and my 2 nephews too. Zachary on the far left - (the one with the big pout on his face - not sure what was the problem there!) - and the little guy is his brother Harrison. |
 | |
| Here you can see where I stamped different colors on the patterned paper - I love how these turned out - Since this is a "BOY" layout - I think cutting them in circles make them more "candy" like -and add a sweet touch to the layout. |
~*~*~*~*~*~
Besides not having many Easter photos - another "Challenge" I had with the items sent was this adorable EGG shaped Tag. I really wanted to use it - BUT - I didn't find any "EGG HUNT" photos - and I wanted to use the gorgeous STRIPE on the page of EASTER BASKET too, so I had an idea!
 |
| First - I outlined the ridge on the embossed tag, along the inner egg shape with a pencil - applying it heavy enough to transfer. |
 |
| Then, I put the tag, face down, on the BACK of the EASTER BASKET paper - on top of a foam mat, and ran my embossing stylus along that indent on the back of the tag. |
 |
| See how the pencil transferred perfectly to the paper, in the correct size / shape!! - Now I just had to erase the pencil from the tag, and cut out the new egg shape. |
 |
| I think it was the PERFECT way to add the year to the Layout - and I "filled" the hole in the top of the tag with a stamped flower and a button! I just LOVE how it came out! |
 | ||
| Here is another close up of the bottom right corner, showing the stamped flowers - you can see the Distress Stain edging, and how I used HELMAR ZAPDOTS to raise up some of the elements too. |
*~*~*~*~*~*~*
Here is the 2nd Layout that I made with some of the Cotton Tail GOODIES! These are photos of my youngest son Jake's 1st Easter. ( After looking at these photos, I want to know who the heck picked out that blue flowered furniture??? What was I thinking?? LOL!!)
 |
| I used BUNNY TAIL to make a frame, and put the lovely stripped EASTER BASKET paper behind it. The strip on the top is from EASTER TITLES, as are the 2 small strips with the eggs and chicks that I cut out - along with the word EASTER from the TITLES page. I also used my We R Memory Keepers SEW EASY Tool with the ZIG ZAG attachment on this layout - it makes sewing on your layouts really "SEW EASY!" I love the look it added to this page. |
Here is how I made the frame -
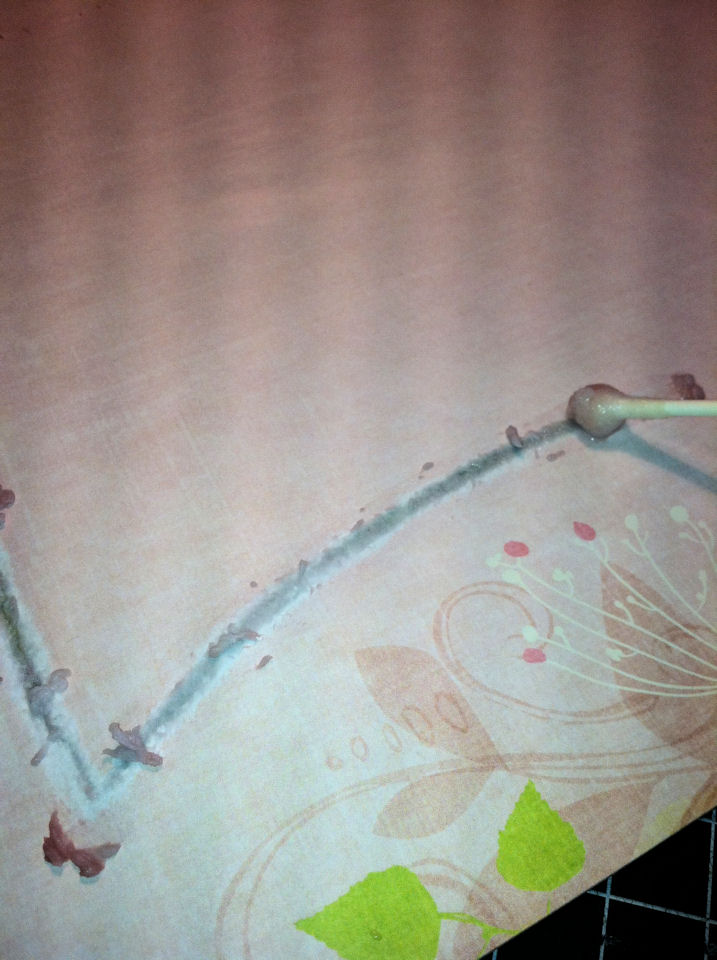 |
| I took the piece of BUNNY TAIL - and ran a Q-Tip dipped in water along the inside of the design -over and over -until the paper started to wear away and the paper was easy to tear. |
 |
| I then wet the paper again with the Q-Tip- (no rubbing this time) about1/4 - 1/2 inch in and along the edge - to make it workable and easy o fold back -pressing and creasing with my finger as I went along. I hit it with my heat gun to speed up the drying process - then inked the edges with Ranger Distress Stain in Broken China ( I just lifted the fold up a little when applying, so I didn't get any on the page itself.) |
 |
| I just love this framed look - the layers and textures make me very HAPPY! |
 |
| Here is a close up on one of the other tag that was included. It had a place for journaling - but I had this one little and ADORABLE photo of my little cutie - so I modified the tag by using an exacto knife to cute around all but the bottom of the little bunny and glazing him with Royal Coat Dimensional Magic I also added a strip of the pink eggs and chick from the EASTER TITLES along the top too! OMG - my Jake is just so cute in this pic - he was such a HAPPY Baby! |
 |
| Here is a close up of the inked edges, and you can see how I glazed these bunnies with Royal Coat Dimensional Magic too - they are just so sweet. The shiny look around the letters and highlighting the flower and the swirls was made with a SAKURA Clear Star Gelly Roll Pen -I even made some of the eggs on the little pink strips sparkly too! |
"THERE ARE NO MISTAKES IN SCRAPBOOKING -
THEY ARE ONLY OPPORTUNITIES!"
 |
| Here is a photo of the original journaling in the top left corner. Well, when I showed my finished layout to my son Jake, he said "Mom - those pictures are from 1995." UT-OH - he was right! - Jake was born in September of 1994 - so his 1st Easter would have been 1995!!! NOW WHAT?! I wrote that with a Sharpie!!! |
 |
| So - I started looking through my scraps and elements that I had left and found this cute little piece from that great TITLE page - I cut it to size - add the the CORRECT year - and VOILA! a few pop dots and problem solved! Well - if you have made it this far - and stuck with me to the end of this post - I truly THANK YOU - for your time and attention! I hope some of my techniques - even my mistakes - have inspired you! Have a wonderful weekend! I hope it is a CRAFTY one! ((HUGS)) ~ Sherri |
Sherri - congratulations on the WRMK guest designer spot! You really rocked the Cotton Tail collection - love how you turned this very pretty paper into boy pages! I loved your bit on the water distressing to create the tearing effect on the paper. Amazing use of multiple photos - I have such a difficult time with that. Congratulations again!
ReplyDeleteLorena
www.scrapingcorner.blogspot.com
Thanks Loren - I appreciate the comment - LOVE your blog too - I'm now a follower!
ReplyDeleteWell of course they asked you to be a Guest Designer. Your art is beautiful. I love that water distressing technique. I'll have to try it. I've mentioned you on my blog and given you the Liebster award for your blog. please visit me and grab your button. Love your stuff.
ReplyDeleteWow, you thought of some really fun techniques. I especially love the pencil transfer. Thanks for sharing.
ReplyDelete